Chair Progress III: Carving Armrests
Hey there ya'll, yup, YA'LL, get over it.
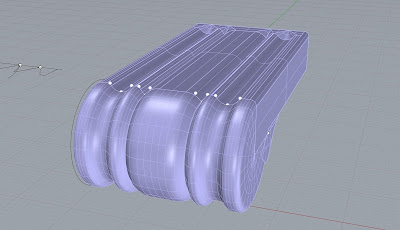
While I thought I would be done by now, I am not. Sadly, a detail that I thought would take 15 minutes, has consumed my mind for the day. I got up early, thinking I'd just chew through it with breakfast, and it has kind of crushed me. While the details in the image above are quite simple and mostly typical of the previous posts, the difficulties of the this armrest lies at the back and underneath. At the back the extruded shape returns to flat to meet the rest of the chair, in a really beautiful way that is quite obviously handmade. Underneath, some delicate flourishes that I'm pretty sure weren't in any plans, because they have no reasonable measurement or shape. to finish there's this lovely detail on the side.
 Which again mostly defies measurement. You can Also, for this angle get a glimpse of the randomness underneath.
 this is the negative I produced to cut that funky swirl into the side, And for a first try, it actually worked really well. I made it using startpoint arcs (hard to manage in 3D) and EdgeSrf. The resulting cut looks convincingly handmade, in my opinion. It has informed how I might approach my topside problem as well, maybe instead of using fillet and loft I should just define the surface I want to see in the first place.
While I thought I would be done by now, I am not. Sadly, a detail that I thought would take 15 minutes, has consumed my mind for the day. I got up early, thinking I'd just chew through it with breakfast, and it has kind of crushed me. While the details in the image above are quite simple and mostly typical of the previous posts, the difficulties of the this armrest lies at the back and underneath. At the back the extruded shape returns to flat to meet the rest of the chair, in a really beautiful way that is quite obviously handmade. Underneath, some delicate flourishes that I'm pretty sure weren't in any plans, because they have no reasonable measurement or shape. to finish there's this lovely detail on the side.
 Which again mostly defies measurement. You can Also, for this angle get a glimpse of the randomness underneath.
Today I mostly just took stabs at different solutions for all of these problems. on the top I tried a whole bunch of different commands, lofts, networks, fillets, combinations of these. None of these worked and I am going to revisit it tomorrow. Underneath, I decided is mostly just an addition to the side profile, so I created a cross section to extrude, and I'll add those tiny details you see later. the only thing I think I can really feel good calling "progress" is this guy
 this is the negative I produced to cut that funky swirl into the side, And for a first try, it actually worked really well. I made it using startpoint arcs (hard to manage in 3D) and EdgeSrf. The resulting cut looks convincingly handmade, in my opinion. It has informed how I might approach my topside problem as well, maybe instead of using fillet and loft I should just define the surface I want to see in the first place.
anyway, see ya'll later, that's right, got you again.


Comments
Post a Comment